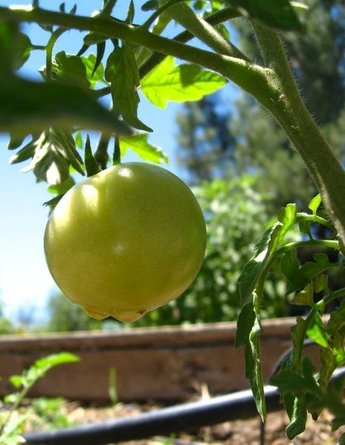
 The best part of gardening is planting your babies and watching them grow... This is definitely the fun part. So now that you have understood how to make compost and prepare your soil for planting, it is time to plant. What do we need to know about Tomatoes? Soil: Fertile, deep, and well-drained (however, wild tomatoes can grow easily in tough soil) Water: Frequent watering required but don’t let them get soggy! Nutrients: Compost and Vermicompost Climate: Nice warm and in full sun 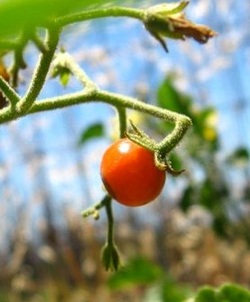 Okay let us take it step by step. Most vegetables require the following steps. 1. Sourcing Organic Seeds or Seedlings 2. Starting Seeds 3. Transplanting Seedlings/Sowing Seeds 4. Intercropping/Companion Cropping to Avoid Pest Problems 5. Maintenance (Watering, Nutrients, Weeding, Pruning) 6. Harvesting 7. Saving Seeds Sourcing Organic Seeds of Seedling is extremely important for all organic farmers or gardeners. Even if you are growing your tomato in a pot, you want to eat organic. Depending on your location it may be difficult for you to find seeds and seedlings that have not been treated with chemicals. You definitely want to avoid buying hybrid seeds /seedlings. Often if you buy seeds in a shop that are not hybrid, read the fine print. It may say treated with thiram or some other chemical. In the case that you cannot find organic, you can grow those as well but make sure you add no more chemicals to your soil or plant. You are most likely to find organic seeds from someone who grows organic vegetables. Often there are some villagers who grow ‘local’ or ‘gauthi, gauran’ vegetables. You can ask them for their seeds as well. Starting seeds: Once you have the seeds, you can start then in seed starters. Make sure the soil for your seeds is the best soil you have. It needs to be fertile and without stones as much as possible. You can also start seeds in a pot or on a small patch on land in your garden. Sow the seeds only 1 or 2cms deep. If the seeds go in too deep then the chances of germination go down. Even scattering seeds is okay if you do not have birds who might eat your seeds. Depending on the quality of your seeds, 1 out of every 3 seeds will germinate. Keep the soil moist and avoid direct sunlight. However cold weather and cold soil does not suit germination. Transplanting seedlings can take place once your seedlings have grown approximately 5-6 inches tall. If you have bought seedlings from a nursery, then the sooner you transplant the better. Prepare the soil for planting and level it so that there is no slope for water to run off or favor one or two plants more than others. Make 3-4 inch holes at a distance of 20 inches. Often tomatoes need support, so planting then in one line is better if you are planting on the ground. Planting one tomato plant per pot is usually the best. Make sure that the pot is not too small because tomatoes require a lot of nutrition to produce fruits. Transplant the tomatoes with care so as to not damage the root system. The roots and part of the stem should be under the ground. Don’t be too gentle otherwise the plant may not remain erect. So be gentle, but firm. It is good to water the plant immediately after transplanting so as to lessen the shock. Intercropping/Companion Planting: It is important not to plant only tomatoes because they are likely to be attacked by diseases. Every plant has a companion plants that keep these pests away. One of tomatoes’ best companion plant is Marigold. Plant Marigold seedlings alternatively with tomato seedlings. They will grow together and keep your tomatoes happy. Maintenance of tomato plants has two major components. One is building support and the other is adding nutrients. Since tomato plants require fertility to grow, adding compost/manure/vermicompost during flowering helps in the formation of fruits. Tomatoes can be allowed to sprawl however to avoid rotting of tomatoes by their touching the ground, supports can help. There are many different kinds of support. I will mention 3 kinds. 1. Stick Support: It is the most simple method by which you can put one single stick for each plant along the stem of the plant and tie the two together. Make sure the stick is longer than the plant to keep up with its growth. 2. Triangle Support: This is also a method for supporting a single tomato plant. Put three sticks in a triangular formation around the plant and cage the plant within the space of those sticks by tying strings. You can even get ready made cages as seen in the photograph below. 3. Trellis: The trellis method can support more than one tomato plant. Place two 4-5ft thick sticks or bamboos on either end of your tomato plant bed/ line of planted tomato plants. Tie two strings across the two sticks, one at the top and one at the bottom. Between these two horizontal strings tie several vertical strings close to each tomato plant. So when the tomato needs support, all you need to do is wind them along these vertical strings. The photographs below can help (click for bigger picture). 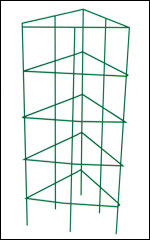 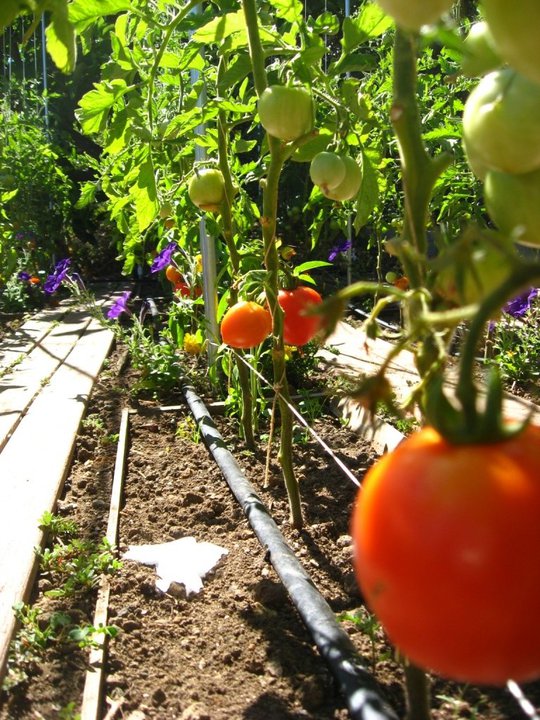 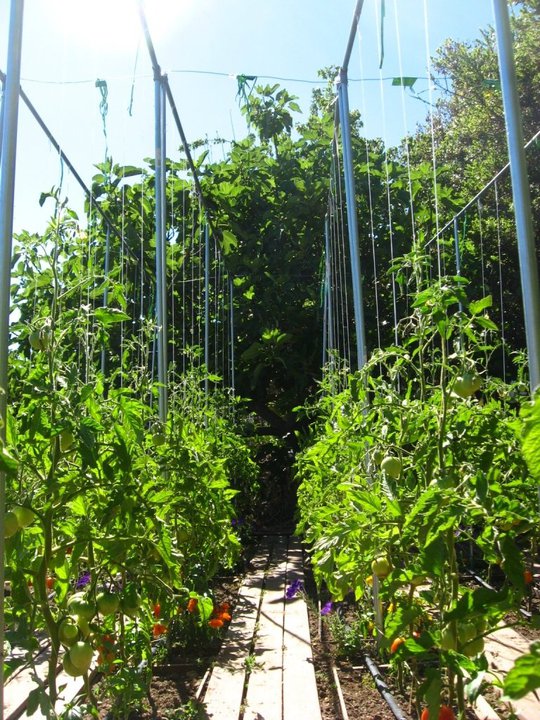 Harvesting tomatoes is easy. Eat them when they look red and juicy! If you want to transport and sell them, it is advisable to pick them a bit before they turn red.
Saving seeds for the next season is essential and efficient. It will help you preserve organic seeds of certain tomato varieties, and also save you the trouble of looking for them during the next round of tomato growing. Here is a good website with information on how to save seeds. So you are now ready to start growing some tomatoes. Don’t forget to water regularly, add compost, and mulch, mulch, mulch!
0 Comments
People are becoming more and more aware of garbage and waste disposal management. We often hope that we could recycle our waste in a more productive way at home rather than sending it away to a land-fill to be burnt or buried. Composting is an easy process that makes a big difference to the recycling and reuse of waste. What can be better than to be able to turn your kitchen garbage into something useful, and most importantly in your own backyard? During my internship at CETDEM (Center for Environment, Technology & Development, Malaysia) I had the opportunity to work with Ms.Tan, an inspiring forerunner for organic farming in Malaysia. Her team at CETDEM has developed a wonderful and easy method of making compost in a plastic garbage bin. Here is how you can do it... 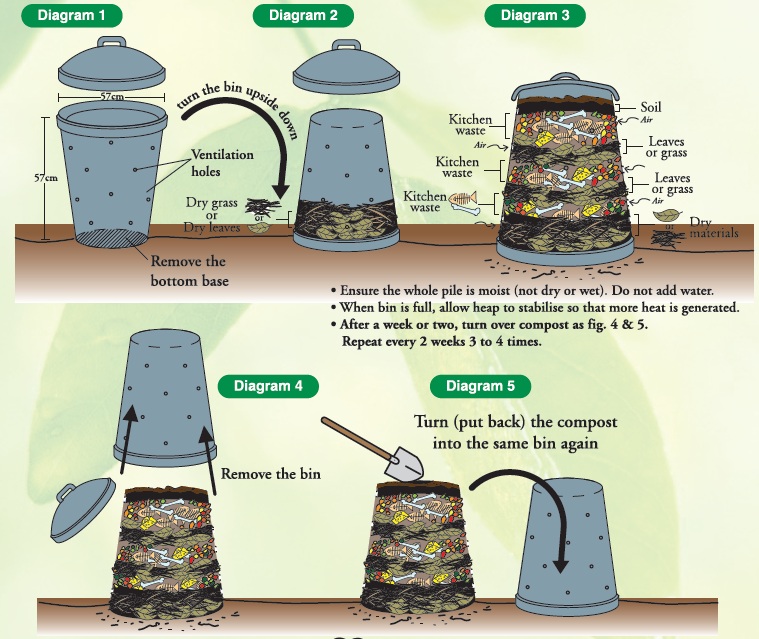
CETDEM's Step-wise Diagram for Making Compost in a Garbage Bin
Step 1: Find a plastic garbage bin that is not too small. A good size would be 57cm height and radius or bigger. It is important for the bin to be big enough for the composting process to take place effectively. Heat is generated during the process of decomposition which is extremely important. A small bin might not be able to generate the required amount of heat. Step 2: Drill ventilation holes on all sides of the bin as shown on the diagram. Also cut out the entire bottom of the bin. Step 3: Find a good spot for your bin to be placed. If you have a back-yard then it is best to place it directly on soil or land. If you do not have a back-yard, then create a small corner in your terrace or veranda where you can put a layer of soil. Place the bin upside down at this spot. Step 4: Always begin your heap with a 15-20cm layer of dry leaves for aeration and drainage. Step5: Add your cooked and raw kitchen waste (only bio-degradable items: avoid paper) on top of the dry leaves and then cover it with more dry leaves/grass and soil. This helps to keep the flies and odour away and also adds the essential carbon required for decomposition. Step 6: Continue putting your kitchen waste and covering it until the bin is full. If your waste is wet them you most probably will not require to create moisture for the compost. However if you feel the waste is too dry and no decomposition is taking place, add some water. However, it has to be only moist and not wet. Otherwise your garbage will rot. Step 7: Once the bin is full do not add any more waste to it. Now you need to turn or mix your compost. This is very easy. Just lift the entire garbage bin which has been upside down, and put it to the side. Using hand gloves, transfer the entire waste back into the upside down garbage bin. This simple transfer helps to turn the compost. Step 8: Turn the compost once every 2-3 weeks. At the end of 2 months you will have beautiful compost ready for use. See previous blog post. Step 9: You can use the compost for your plants or store the ready compost in plastic bags and keep it out of the rain. 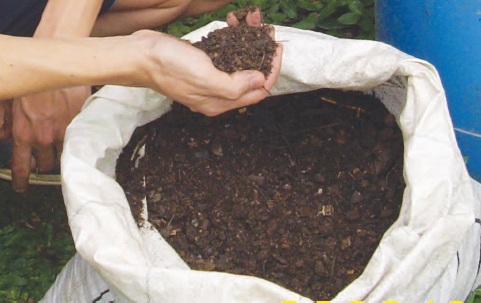
Final Product!
Remember not to add any more garbage to your bin once it is full. As the decomposition occurs, the garbage will shrink. However, if you add new waste to it, it will slow down the process and take a long time to give you the good-looking compost that you need.
So keep it simple! |
Principles and Practices of Organic and Natural Farming Archives
November 2018
Categories
All
|
 RSS Feed
